

Linux Basics for the Aspiring Hacker, Part 3 (Managing Directories & Files)
This is the third installment of my series on basic Linux skills that every hacker should know. Although some hacking tools are available for Windows and Mac, every real hacker uses Linux—for good reason.
In this installment, we'll look at how to manage files and directories in Linux, namely copying, renaming, moving, and viewing. Then we'll look a bit at networking and the ifconfig command.
Step 1Copying Files (Cp)
In my previous installment in this series, we created a file called newfile in the /pentest/wireless/aircrack-ng directory.

Let's imagine that we need a copy of the file in our home directory, user root. We can do that by:
bt > cp newfile /root
We simply tell Linux copy (cp) the newfile (in our current directory) to the directory of the root user (once again, don't confuse this with the / directory). We don't need to specify the directory that newfile is in, if it's in our current working directory. The copy command makes a copy of the file specified and places it in the specified directory leaving the original untouched and unchanged, so we now have two copies of the original file.

You can see in the screenshot above that when we change directory (cd) to the root user and list the files (ls) that now a newfile copy appears in that directory.
What if we wanted to copy a file from a directory that wasn't in our current working directory? In that case, we would need to specify a path to the directory, such as:
bt > cp /etc/newfile /root
Also, note that we don't need to specify the file name we're copying it to. It simply makes a copy and gives it the same name as the original "newfile."
Step 2Moving Files (Mv)
Unfortunately, Linux doesn't have a rename command for renaming files, so most users use the move (mv) command to both move files and rename them. Let's imagine now that we placed that newfile in the wrong directory and we really wanted it in the root (/) directory. We can use the move command to do so.
bt > mv /root/newfile /
This command says, move the newfile from the root user directory to the root (/)directory. The move command literally moves the file and does not leave a copy where the old one existed. Note that the newfile has moved to the root directory.
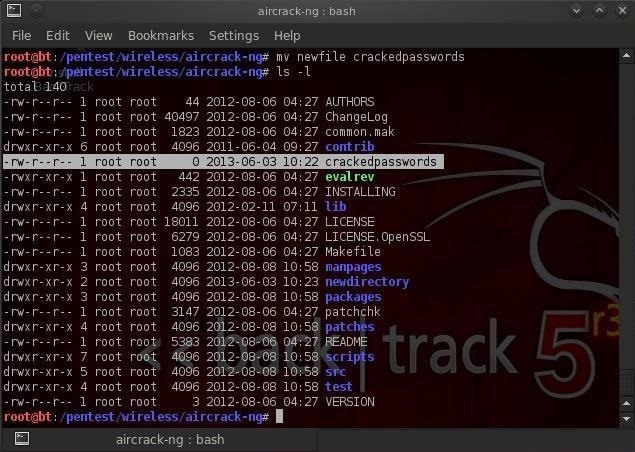
Sometimes, we want change the name of the file and not actually move it to a different location. The move command can be used for that also. We simply tell Linux to move the original file to a new file with a new name. Take for instance our newfile in the aircrack-ng directory. Let's say that we want to rename that file to "crackedpasswords. We can simply type:
bt > mv newfile crackedpasswords
Notice here that I did not use any directory paths because I was moving a file in my current working directory and to a file in my current working directory. If we run a directory listing now, we can see that newfile is gone and crackedpasswords now exists in the aircrack-ng directory.
Step 3Viewing Files (Cat, More, Less)
From the command line in the terminal, we can view the contents of files by using the cat command. cat is short for concatenate, which is a $20 word for putting together a bunch of pieces (we are putting together the words for display on the screen). Concatenate is a fancy word, but is used throughout computer science and information technology, so add it to your vocabulary.
Staying in the /pentest/wireless/aircrack-ng directory, let's cat some files. First, let's get a listing of files in this directory.
Notice in the screenshot above, there is a file called README. Often, software developers use this file to provide important notes to their users. This file can be critical, especially with hacking tools because most are open source and seldom have manuals. Let's take a look at the contents of this file.
bt > cat README
When you run this command, you'll see lots of text running across your screen. Obviously, it goes by way too fast to read, but when its done, we could use the scroll button on the terminal to scroll up to read all the text. There is another way, though, that might be easier.
There are two commands that work similar to cat but don't simply run the text across the screen until it hits the end of file. These are more and less. They are very similar, each only displaying one page of information on your screen until you prompt it to scroll down. Let's try more first.
bt > more README
You can see that less followed by the filename, once again displays the READMEfile until it fills up my terminal just like more. Though, note that less displays the name of the file that I'm viewing in the lower left-hand corner. Probably more importantly, less has powerful text searching capabilities that are missing from more. I can search for text within this file by typing the forward slash followed by what I'm searching for and less will find it and highlight it for me.
That's one of the primary reasons I prefer less.

Step 4Networking (Ifconfig)
Before I finish this tutorial, I want to show you one last simple networking command, ifconfig. Those of you comfortable with Windows networking, know that you can use the ipconfig command in Windows to display key information on your networking configuration. ifconfig in Linux is very similar, with only one letter different. Let's run ifconfig see what it tells us.
bt >ifconfig
As you can see, it displays much of the key info I need to know about the network configuration of my system including IP address, netmask, broadcast address, interfaces, MAC address of my interface, etc. We'll spend some more time with networking in future Linux tutorials.


Comments
Post a Comment