How to Backup iPhone or iPad to External Hard Drive with Windows PC
When you backup your iOS device using iTunes, the backup data is automatically saved to your local drive on your computer . Users with a limited storage space on their computer usually run into problems when backing up their iPhone or iPad as it requires several gigabytes of space to save the backup.
Depending on the size of data on your iPhone or iPad, backing up several times can take up a lot of space on your computer. For those of you who are running into storage problems, there is a workaround to solve this issue. By using an external hard drive you can save your backups to that drive so that it doesn’t take any space on your computer. This can be done by using a software called iMazing, which is a popular iOS device manager that is capable of saving iOS backups and allows you to manage the files and data on your device.
In this tutorial , we’ll show you how to use iMazing to backup your iPhone or iPad to an external drive on Windows.
How to Backup iPhone or iPad to an External Drive on Windows
Step 1: Download and installing iMazing on your computer
Download: iMazing
Step 2: Connect your iOS device to your computer and open iMazing.
Step 3: Once iMazing detects your device, the first thing you have to do is to change the location where the backups are stored. To do so, click on your device in the left sidebar.
Step 4: Click on the cog icon as shown below to open your device’s settings.
Step 5: Now click on the Change button next to Backup Location.
Step 6: Select a disk, or click Choose a custom location to choose a folder on the external drive where backups should be saved.
Step 7: Click on the Done button to save the new backup location.
Step 8: Again, click on the Done button to close the device settings.
Step 9: To take a backup, click on the Back Up button.
Step 10: Make any required configuration from the available backup options, then press the Back Up button in the bottom right corner.
Step 11: iMazing will now begin the backup process. It can take anywhere between a couple of minutes to half an hour or more to backup your iOS device depending on the amount of data on your device.
A folder is created on your external hard drive called “iMazing.Backups” which is where all your iOS backups are stored. Avoid deleting this folder or modifying any of its files as it can cause your backups to become corrupted.
How to Restore iPhone or iPad From a Backup Using iMazing
Step 1: The first step is to turn off Find My iPhone. Open the Settings app on your device, then tap on your name at the top. Next, go to iCloud > Find My iPhone and toggle it off.
Step 2: Connect your iOS device to your computer and open iMazing.
Step 3: Choose your device from the left sidebar, then click on Restore a Backup.
Step 4: iMazing displays a list of all the backups that have been found for your device. Click on the backup that you want to restore, then press Choose in the bottom right corner.
Step 5: If you wish to handpick the apps and data that should be restored to your device, then click on either of the Customize buttons, otherwise press Next to skip this.
Step 6: Click Next to confirm the restore. A confirmation dialog is displayed, click on Restore.
- Note: If your backup is encrypted, you will need your backup password to initiate a restore.
Enter your password and click OK.
Step 7: iMazing will now begin the restore process and it will take a while depending on the amount of data that needs to be restored.You can safely click Close Window at any point to return to iMazing’s main view, the restore operation will continue in the background. Once the restore is done, your device will restart and you can continue using it as normal.
Please note that while you can preview many iMazing features using the trial version like backup and install apps on iPhone or iPad without iTunes, you need to buy a license to restore a backup or reinstall/update iOS. You can buy the single computer license of iMazing for Mac or PC $39.99, the Universal license for $49.99, or the Family license for 5 computers for $69.99 if you want to remove these restrictions.
Download: iMazing
How to backup iPhone or iPad on Mac
Getting iTunes to automatically recognize and backup your device may not be the easiest thing in the world to do, but is definitely worth it if you are running low on disk space. You will be using commands lines and functions, so a little familiarity with that would be helpful. With or without previous knowledge of those functions, you’ll need your mobile device, a USB cable to hookup to your computer and an external drive. Once you have all that we are ready to go.
Step 1
Connect your external hard drive to the computer. Make sure you have an external with enough space to hold your iPhone or iPad backup(s). You can create a new folder on the drive called “iPhoneiTunesBackups” to make sure we can find the folder later and properly address it in the following steps.
Step 2
Open a new Finder Window by opening Finder (Command + Spacebar and type Finder) and going to File -> New Finder Window.
In that new Finder window type Command+Shift+G to open the go-to-folder path. In the blank text field enter:
Step 3
This will take you directly to the folder we will be working with. Select the folder titled “Backup” and create a copy .
Step 4
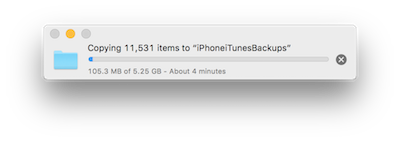
Go to your external drive and find the folder you just created. My folder is called iPhoneiTunesBackups. We are going to paste the copy from Step 3 into the folder on our drive.
Step 5
Make sure that the folder is correctly copied. Now, back in the original folder (the one found entering ~/Library/Application Support/MobileSync/ into Finder) rename the folder to BackupOld or something along those lines.

You can also delete this folder, but I think it’s always good to keep things just in caseyou want to go back to the original.
Step 6
Open Terminal (Command + Spacebar and type Terminal) and enter the following:
ln-s/Volumes/MYPASSPORT/iPhoneiTunesBackups/Backup/ ~/Library/Application\ Support/MobileSync
You will need to change the sections after Volumes to match the name of your external drive -> MYPASSPORT and the name of the folder on your external drive ->iPhoneiTunesBackups. Once you have checked that all of that is accurate in Terminal, you can hit enter/return. Quit Terminal.
Step 7
After quitting Terminal, you may be wonder what the heck just happened. So to confirm that Step 6 did anything you are going to repeat Step 2. Open a new Finder Window by opening Finder (Command + Spacebar and type Finder) and going to File -> New Finder Window. In that new Finder window type Command+Shift+G to open the go-to-folder path. In the blank text field enter: ~/Library/Application Support/MobileSync/ (should already be saved in the text field).
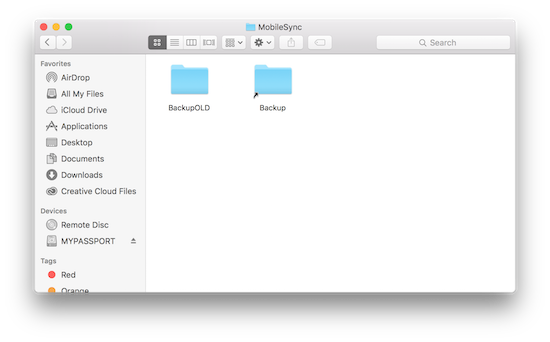
If our steps were successful, you will see the Old Backup folder as well as the new, copied Backup folder with an arrow pointing to it. That just means that this Folder is now linking to the Folder that exists on your external.
Step 8
Open iTunes and connect your device. Find the device within iTunes and in the Backups section, click This Computer and choose Back Up Now. This new backup will be saved on your external hard drive if all the steps above were done correctly.
Step 9
Check to make sure your most recent back was actually saved onto your backup folder on the external. You’ll be able to tell by the time stamp or if there is a new file that was not there before.
Once that has been confirmed you are good to go. Every time you back up your iOS device to your computer, iTunes will store that backup on your external. Of course, your external needs to be plugged in whenever you wish to create a new backup.
If you would like to undo all of this lovely work, simply go back to ~/Library/Application Support/MobileSync/ and delete the folder with the arrow on it. Then change the name of the old folder back to back up . That’s all there is to it.


Comments
Post a Comment