

How to Free up Space on iPhone in iOS 11
In the last couple of years, Apple has started to wake up to the fact that their entry-level iPhones have too little. storage capacities. Last year iPhones started at 32GB and this year it’s 64GB. But a lot of us are still stuck with 16 GB iPhones. To help us out, Apple keeps adding space saving features in iOS updates .
In iOS 11, these range from new compression standard to new features. iOS 11 uses HEIF format for photos . and HEVC for videos. They both offer 50% space saving at the same quality. Plus, iOS 11 has an entire section for personalized storage management recommendations. If your iPhone is running low on storage space, take the following steps and you’ll reclaim a couple of GBs in mere minutes!
Tips to Free Up Space on iPhone in iOS 11
1. Automatically Offload Apps:
The first thing you should do when running out of space is to find apps that you can delete. You can do this manually by going into Settings -> General -> iPhone Storage(iPad Storage on iPad) and seeing which app is taking the most storage space.

In iOS 11, this whole process can be automated for you. From the top of the iPhone Storage section, enable the Automatically Offload Apps feature.
This feature keeps tabs on which apps you use frequently and which apps you haven’t touched in weeks/months. When iOS knows that you’re running out of storage (while recording a 4K video for example), the system will automatically delete apps you haven’t used in a long time. It’s important to note that only the app itself will be deleted (redownloading an app is only a tap away). All your documents and data for the particular app will still stay on the device. So when you get the app back, it will be just the way it was before it was kicked off from your iPhone or iPad.
2. Follow the New Storage Recommendations:
Keep an eye on this new Recommendations section in iPhone Storage section. You’ll get advice on how to clear space. Everything from getting rid of iMessage attachments, to removing old iTunes movies.

3. Delete Unwanted Photos and Videos:
As awesome as the iPhone cameras are, all of us have a habit of taking way too many photos. That’s a great photography technique. The more photos you click, the more chances of you getting a really awesome shot. But the problem is that we forget to delete photos that weren’t so great. For every awesome Instagram worthy photo, there are 10 photos worth deleting.
You should take some time going through your Camera Roll, select all the photos you don’t need and delete them. You’ll easily find a couple of hundred photos or screenshots worth deleting and you might end up reclaiming a couple of GBs right there.
4. Use iCloud Photo Library or Google Photos:
Once you’ve cut trimmed your photo library to the essential, it’s time to back it up to the cloud and remove old photos from your device . The most reliable way to do this is to use iCloud Photo Library.
The feature can be enabled from Settings -> Photos. But if you have more than 5 GB worth of photos, you’ll need to upgrade your iCloud plan to 50 GB/month by paying $0.99/month. I think that’s price worth paying for the peace of mind.

Once your photos are uploaded to iCloud, you can ask iCloud Photo Library to only keep the latest photos on your device. From the Photos section, tap on Optimize iPhone Storage.
If you don’t want to spend money on iCloud storage, you can upload unlimited photos for free on Google Photos (although they’re compressed). After uploading photos to Google Photos, you can ask the app to automatically delete those from your local storage.
5. Delete Local Media Content:
When you’re in the iPhone Storage section, you’ll see which app is taking up how much storage. For some apps, it will be the document storage that’s taking up the more space. If you’ve downloaded movies from iTunes or Netflix, it’s just sitting there on your device.

The same goes for podcasts, audiobooks and more.
So go into those apps and manually delete the downloaded files. If you see that apps like Twitter or Facebook are taking up document storage space of 1 GB or higher, there’s no way to get rid of that other than deleting those apps and reinstalling them.
6. Delete Safari Cache:
From the Settings app, got to Safari and tap on Clear History and Website Data. Confirm from the next popup. This will delete the entire history, cookies and cache data from websites).

7. Remove Live Part of Live Photos:
When you take a Live Photo, you’re also saving a three-second video and audio along with the still. Live Photos are awesome and sometimes they just make you smile. But for most photos, it’s not really useful and it takes up space.

Use the Lean app to get rid of Live Photos in batch. The app costs $1.99 and it’s well worth the price . When I removed the Live prat from 4 photos, I got 12 MB back. If you’re removing Live Photos from hundreds of photos, you can recover a couple of GBs of data easily.
8. Delete from Recently Deleted Album:
After you’ve deleted photos manually, or you’ve deleted the Live Photos, remember to delete photos from the Recently Deleted album. That’s the only way to actually get the storage space back.
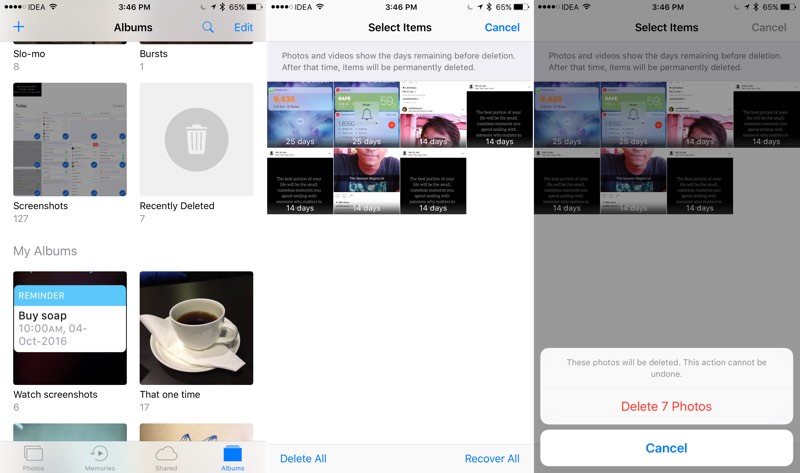
From the Photos app, tap on the Albums tab and select Recently Deleted. Select all photos and tap on Delete.
9. Automatically Delete Old Messages:
If you’re not too attached to your iMessage conversations, you can automatically delete old message Go to Settings -> Messages -> Keep Messages and select 30 daysor 1 Year.

10. Delete Attachment from Messages:
Go to the Messages app, tap on Edit and start deleting old message threads that have a lot of media.
Alternatively, you can go into a conversation, tap on the top image and see all the attachments for the conversation right there. Select a photo/video and tap on the Delete button to get rid of it.

11. Delete Extra Siri Voices:
If you’ve downloaded extra Siri voices or accessibility reasons or just for a change, it might be a good time to get rid of them. A single voice file can with as much as 900 MB.
Go to Settings -> General -> Accessibility -> VoiceOVer -> Speech and select the language.
Then tap on Edit, swipe on the language and select Remove.

12. Optimize Apple Music Storage:
If you use Apple Music, you can let iOS automatically manage how much storage your Apple Music library takes up.
Go to Settings -> Music and select Optimize Storage. You can select from 4 GB to 64 GB (depending on your storage size). Once you reach the limit, iOS will start deleting music that you haven’t listened to in a while.

13. Remove iTunes Cache:
If you use iTunes to rent or buy movies, the app might still have some cached files laying around. These aren’t exposed to the user and could be a couple of GBs. One way to get rid of cache files is to do a soft reboot. Tap and hold the Home and Sleep/Wake button (Volume Down + Sleep/Wake button for iPhone 7 users) till you see the phone reboot.
14. Disable Auto Downloading Media from WhatsApp:
If you’re a part of multiple gourd chats in WhatsApp, you could be inundated with videos and images. By default, WhatsApp will download all media and will save it to Camera Roll. Go to Settings -> Chats and turn off Save Incoming Media to stop this.

15. Try Downloading a Huge App or Movie:
This is a hack that might or might not work for you. If you’re running out of storage, go to the App Store and download an app that takes up more storage space than what your device has free. You can try the same with a by downloading an HD movie from iTunes.
When you do this, iOS will automatically try to clear cache and junk files to make space for the app. After a while, stop downloading the app. Now you’ve got some extra storage space.
Last Resort: Reset Device
If the “System” is taking up too much space and you just can’t figure out how to reclaim the space, the last resort is to reset your device. Go to Settings -> General -> Resetand select Erase All Content and Settings.


Comments
Post a Comment